

What is the best way to set up a server for media buying?

- September 02, 2022
- by Affbank Team
- Reviews: 0
At MyLead, we recognize how challenging it is for a new media buyer or affiliate to manage everything - servers, trackers, traffic, offers, targeting, optimization, etc. We can help you in several ways: we will supply you with the best deals and the most targeted advertising. Fortunately, we can teach and produce step-by-step lessons for anyone new to media buying and affiliate marketing.
Mentor Alex here, and today I’m going to tell you how to set up a server. You might be wondering, "Why do I need it? There are many free solutions available, including sites.google.com." I will show you why it’s worth it.
What's the point of having a server?
There are several reasons to purchase a server in this industry:
- It is completely under your control.
- There are no limits on the number of landing pages or affiliate sites you can create for your campaigns.
- You can choose the server's GEO location; for example, if your campaign is in Italy or Austria, you won't need a server in the US; instead, you'll need one in Europe (usually Germany).
- You can connect your domain that is related to the campaign, such as takeyouriphone.com, if you are running iPhone sweepstakes offers.
"Servers are costly, and managing them is difficult for a novice user - it needs a lot of knowledge and effort," you say now. That is not true! A virtual private server (VPS) can be acquired for as little as $6 or $12 per month (about $0.20 or $0.40 per day). I completely appreciate the level of complexity, which is why I'll show you how to set up your VPS quickly and efficiently.

Having a server for the purpose of affiliate marketing. What will it require?
You'll need a Digital Ocean or Vultr account, terminal access, a free Cloudflare account, and an FTP client to get started. Let's start at the beginning and work our way through the steps!
For this article, I'm utilizing a Digital Ocean VPS, so if you don't have one yet, click this link to earn a $100 bonus as a special bonus for all MyLead publishers!
Log in to your Digital Ocean account and go to the upper left corner to the "New Project" link:

You can now begin working on your new project:
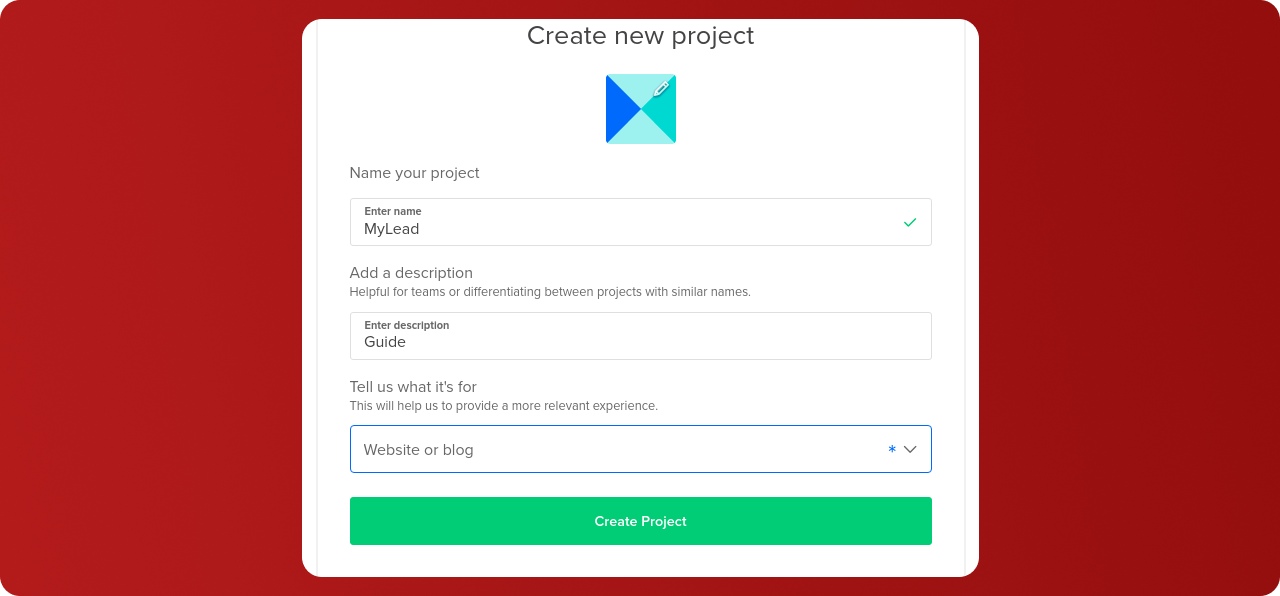
Fill in the "Name" and "Enter description" fields with whatever you want, then click the green "Create Project" CTA button and select "website or blog" from the dropdown menu.
In one minute, you'll be able to make your first droplet:

Click on the “Get Started with a Droplet” button:

Choose a strategy:
All novices can use the "Basic" Plan, as well as the $12 and $18 choices. Start with the $6 bundle if you only plan to send a few hundred clicks per day.
Although regular Intel droplets with SSDs are less expensive, I advocate utilizing NVMe SSDs.
Select "Choose a datacenter region" from the drop-down menu. If you want to run campaigns in Europe, choose Frankfurt or Amsterdam as your campaign location. If your advertising is focused on Asia, for example, use Singapore.
It's time to move on to the next step; scroll down to see the nest options:

When it comes to VPC settings, you can select some or none, as I did, and then proceed to "Authentication." The "Password" tab must be chosen. In the "Construct root password" step, you must create your password according to Digital Ocean's requirements.
Important tip: Create a strong password and write it down on paper to keep track of it!
Return to the top once you've completed creating passwords and prepare to select your VPS OS:

You have the option of using Ubuntu 18.10 or Debian 9.0. There aren't many differences between Ubuntu and Debian because they're both based on Debian. I'll be running Ubuntu 18.10 today (for reasons I'll explain later).
Scroll to the bottom of the page. It's worth going over the "Finalize and create" section again:

Add some tags if you want, but it's not essential. Enter a custom hostname or leave it blank.
Let's continue. You'll be prompted to assign the droplet to a project and choose whether or not to enable backups:

Please bear in mind that activating backups will cost you 20% more, so you must decide whether the extra cost is worthwhile.
When you're ready, simply click the "Create Droplet" CTA.
Congratulations! Your very first droplet has formed. If everything is in working order, you should see something similar to this:

Copy the IP address of your droplet and paste it into your terminal if you're running macOS or Linux on your desktop or laptop. If you are using Windows, please download PuTTY here and follow this guide to connect your Droplet to Windows using the "PuTTY" program.
Because I'm running Linux on my laptop, I'll just open my terminal:

Keep in mind that "ssh root@your server's IP" is only for UNIX machines, not Windows, despite the fact that the technique is practically identical.
You will be asked to agree to keep the connection open at this point. Then you must supply your server's password:

You should see something like this if you're using Ubuntu 18.10:

The first step in a new installation should be to update the system. This may be accomplished with just two commands: sudo apt update and sudo apt upgrade. The process will take 2-4 minutes to complete.

Now is the time to create a control panel that will allow you to add more domains. It will make your life easier by installing Nginx and Apache web servers, as well as an FTP server and a MySQL database server.
In this video, I'll be using the Vesta control panel.
VestaCP is only compatible with Ubuntu 18.10 or earlier, Debian 9 or earlier, and CentOS 7 or earlier (the full list of supported OS can be foun here), which is why I'm using Ubuntu 18.10.
Run the following command while connected to your server: curl -O http://vestacp.com/pub/vst-install.sh:

To use it, type bash vst-install.sh into the command prompt and press Enter:

Select "y" and provide your email address when the installation asks for it. You can skip the rest of the questions by pressing the Enter key (Vesta will use the default settings).
Wait for the procedure to finish:

Pro tip: Remember to save your Vesta Login username and password somewhere safe!
Now it's time to put our Vesta Panel to the test: open your browser and navigate to the control panel's address. In my case, it's https://159.223.105.46:8083, as shown in the screenshot above, but use whatever address you choose.
When you initially enter the control panel, your browser will show you the following:

That’s nothing to worry about. Select the "Advanced" option, then accept the following terms:

You should be taken to the login page for the Vesta Control Panel:

Log in with your password and the default username "admin."
And here's the end result:

Congratulations, if you've made it to the Vesta dashboard; if not, double-check your password or try reinstalling the control panel (VestaCP).
Let's get started with the domain configuration.
I normally use Namecheap and will continue to do so in the future. I won't teach you how to buy a domain; instead, I'll show you how to connect it to Cloudflare and the Vesta Panel.
After you've purchased your domain from Namecheap, log in to Cloudflare (if you don't already have an account, please do so, it's completely free) and click the "Add site" button in the middle top:

You will see the following menu:

Fill in the blank field under "enter your site" with the name of your site - no "WWW" or "HTTP" - just the name and extension (I've hidden my site name for security reasons) - and then click the blue "Add site" CTA button.
Following that, you must choose a plan. The basic requirements of your affiliate are met by the free plan:

Click "Continue" after selecting "Free." You will be sent to the following page named "Review your DNA records":

First, delete all existing entries for this domain because you won't be using it for anything other than landing pages. Then, to see the following menu, click the "Add record" button:
Leave the "Type" field blank, add "@" to the "Name" field, and for IPv4 enter your server's IP address in the format xxx.xxx.xxx.xxx, then click the "Save" button!
Replace "www" in the "Name" column this time and save the record:

You should see something like this if everything went well:

Press the "Continue" button to discover what happens next.
Prepare to switch over to Cloudflare's nameservers.
To change the DNS for a domain, go to your Namecheap dashboard and select "Manage."

You've arrived at the domain configuration page:

Select "Custom DNS" from the "Nameservers" section and paste the name servers from your Cloudflare account (as displayed in the screenshot above) (step 2 from the screenshot below). Save them and return to Cloudflare to double-check that the nameservers (step 3 in the screenshot below) are functioning properly.

In the next stage, you'll get setup recommendations, and my advice is to at least have a look at them:

After hitting the "View recommendations" button, you'll see the following:

I intend to apply for both positions. The first will allow my site and landing pages to have a secure SSL certificate, while the second will minify your code, making your landing pages load faster. The best part is that they are available for no cost. Thank you, Cloudflare!
That concludes it. Before checking Cloudflare for the newly added domain, you'll need to wait 15-30 minutes (sometimes longer). If you come across something like this...

Job well done!
There's one more item to accomplish before we submit our landing page to the server.
On the Vesta login screen (in case you forgot how, just scroll ahead), enter your username (admin by default) and password, and log in.
Once you've logged in, go to the "WEB" tab and click the blue "+" icon:

In the "Domain" column, type the name you gave Cloudflare, and in the "IP Address" box, type the server's IP address. The remainder of the options can be ignored. After scrolling down, click the "Add" button.
Now you must upload the landing page to the server!
Go to the "Site Manager" or whatever your software calls it, and click "New Site": Open your favorite FTP client (I use FileZilla, but you can use another) and go to the "Site Manager" or whatever your software calls it:

When you create a new connection, be sure you're using the SFTP protocol. Click Connect after entering your server's IP address for the host, leaving the port blank because the FTP software will use the default, Logon type - "Normal," user - "root," and password - your server's password (not the VestaCP one!)
If you followed the steps successfully, you should receive the following message:

Now navigate to /home/admin/web and check for the folder that has the name of your domain:

Locate and open the "public html" folder:

Remove the "index.html" and "robots.txt" files from the files you see.
Make a subfolder for the landing page in the public html folder, which will be uploaded there. My subdirectory is called "test," but you may title it whatever you want:

Once the uploading is complete, it's time to put our work to the test.
Open a new browser window and type your landing page's address, such as (yourdoman.com/test):

My landing page is up and running, and everything appears to be in order. You have complete control over how many landing pages you create (just remember to keep them in different folders)
If you get an error message like this in your browser:

Click the "SSL / TLS" menu on the left after selecting the domain in your Cloudflare account:

Change the option on the right side of the screen from "full" to "flexible," and your problem should be solved immediately! Recheck your landing page; it should now be functional.
Okay, advertisers. That's all for today! Now it's time to team up and make some money. We'll talk soon!
Alex, MyLead
MyLead is an affiliate network that has been operating since 2014. To date, it has won many awards, such as the “Fast 50” award from Deloitte Technology or the 1st Prize for best ecommerce affiliate network from Conversion Club. The network provide its users with over 3,000 affiliate offers, free monetization tools and many educational materials. In the middle of 2022 there were almost 500,000 users registered on the platform.
Recent Posts
June 16, 2026
OurDream.ai Affiliate: Up to $60 CPA, 40% RevShare, and an Offer in the Adult AI Niche
OurDream.ai is an AI-powered platform featuring virtual characters and companions. Users can create...
Read moreJune 12, 2026
Kadam Introduces KAI: A Personal AI Assistant for Campaign Management
Meet KAI, Kadam’s personal AI cat-agent. It helps launch campaigns, review statistics, find the reas...
Read moreJune 08, 2026
iOS fingerprints instead of desktop: how Octo Browser helps extend account lifespan
Octo Browser is a mobile app for iPhone/iPad designed to handle Safari fingerprint generation.
Read more
Written by
Affbank Team
Hey there! We combined years of experience, a ton of enthusiasm and our hunger for knowledge to give you the best that we can - Affbank. Leave a comment or reach us by email support@affbank.com